One of the most crucial tasks for a Sales rep is to generate quotes quickly and precisely. Apttus Configure Price Quote (CPQ) is a sales tool that can help quote complex and configurable products with ease and consistency. CPQ produces accurate quotes making complex products, pricing, and business rules centralized, automatic, and available in real time. Apttus CPQ enables you to manage the Product's pricing and adjustments. Plenty Out of Box functionalities help deal with even tricky pricing scenarios.
Below are the steps mentioned to set up pricing for a product in Apttus.
Step No. 1: Product Setup:
The first step to start with CPQ configuration will be adding Products in you Salesforce Org.
Step No. 2: Create Price List:
Once all the products are added and configured, the next step is to set up pricing for products.
Pricing of the Products enables you to set up the total Pricing Structure. The Primary thing for it is setting up a price list, and it is necessary as it will control which products will be visible to the end-user on the catalog page. The Price List will be further associated with the Product by Price List Items.

Steps:
- On App Menu, click Apttus CPQ Admin and then click the CPQ Admin tab. The new admin console is launched.
- On the Pricing menu, click Manage Price Lists.
- Click New PriceList.
- Enter the details and click Save.
OR
- From App Launcher, Click on Apttus Pricing Setup App and then click on the Price Lists Tab.
- Click on New
- Enter the details and click Save.
Step No 3: Create a Price list item for a Particular Product:
The price list item is directly associated with the products, and it contains detailed pricing information about it. There can be multiple Price List Items for a single product.
Each price list item will represent a different way a customer is charged for a product, for example, Subscription fee, Standard Price, License fee, Implementation fee, and more.
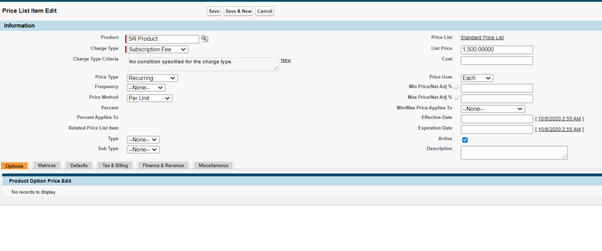
Steps:
- Navigate to the Product record for which you want to set up a price list item.
- Click on Product Console.
- Click on New Price List Item
Enter the following details
Field Description Charge Type There can be multiple types of charges for a single product, and giving a charge type to Price List Item is a way to capture multiple types of fees for a product.
Example: Subscription fee, Standard Price, License fee, Implementation fee, Usage Fee, and More.
The charge type will be automatically added to the cart once the Product is selected.
List Price List price is given to display a price in the catalog.
List price will be overridden if the price list item has a matrix.
Price Type Values for Price type and when they are to be used:
- One Time – If the Product is to be charged once at the time of purchase and not be repeated per year.
- Recurring – If it is a subscription product
- Usage - If the Product's billing is to be done as per usage and not at the time of purchase. Pay as you use.
- Included Usage
Frequency The frequency will indicate how often a product will be charged. This field will be based on your selection from the Price Type field. Price Method - Per Unit: Multiplies the Price with the quantity.
- Flat Price: Applies a flat price.
- Percentage: Enables the following fields Percent, Percent Applies To, Related Price List Item.
- Related Price: Used when the Price is calculated as a function of the Price of other lines in the same shopping cart.
- Tiered Rate: Default price method for Usage Price Type.
- Enter the criteria if there are Multiple Price List Items for a single product.
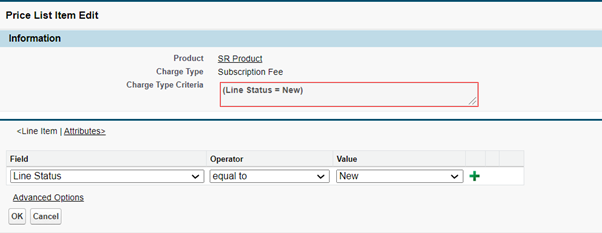
- Price List Item must be active for the Price to display on the catalog page.
- Save the record
Step No. 4: Batch:
Once you have created the price list item and are done with all the changes next step to run batch
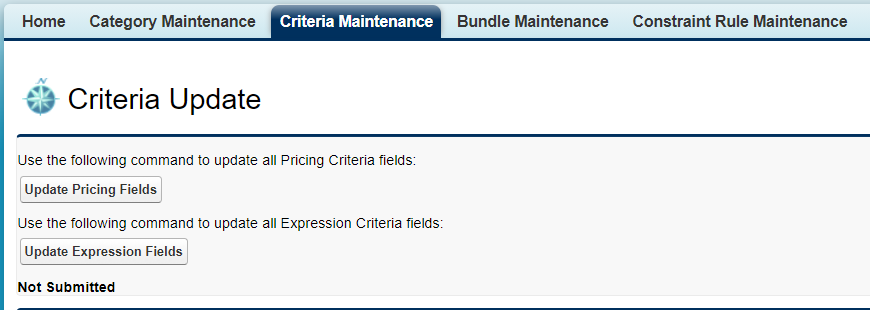
- From App Launcher, Click on Apttus Batch Updates App and then click on the Criteria Maintenance Tab.
- Click on Update Pricing Fields Button.
Other Settings Available in Price List Item:
- After saving the Price List Item, Click on the Edit Button. Different tabs will be visible now with respective fields.
- Defaults: You can configure default values from Defaults Tab. Brief description of the fields under this tab:
- Default Quantity allows you to enter the quantity.
- Default Quantity From enables you to select the option from where the default quantity is to be considered. Default Quantity Field is dependent on the Default Quantity From Field. For example, if Quantity is being derived from a product attribute, you need to select the product attribute using which default quantity of Product is derived.
- Default Price From allows you to select an option from where default price can be considered—options such as Advanced Formula, Product Attribute.
- Default Price Field is dependent on Default Price From Field.
- Default Selling Term allows us to enter the selling term.

Tax & Billing:
You can configure all Usage, Billing, and Tax-related information for your Product from the Tax & Billing tab.

Finance & Revenue:
You can configure all finance and billing-related information for your Product from the FINANCE & REVENUE tab.

Miscellaneous:
You can apply miscellaneous pricing to a product from this tab.
Brief description of the fields under this tab:
- You can include an option price in a bundle.
- You can enable price ramps if a product is rampable and enable commitments.
- If the Enable Auto Ramp Creation option is selected, ramp lines will be automatically created once the User has selected the number of periods, frequency, etc. on the cart.
- You can control if a usage tier can be modified or not.
- You can manually adjust options pricing for a bundle. You can also control the options price rollup to the bundle price and display options adjustments on the pricing cart page.

Advanced Pricing:
Price Dimension:
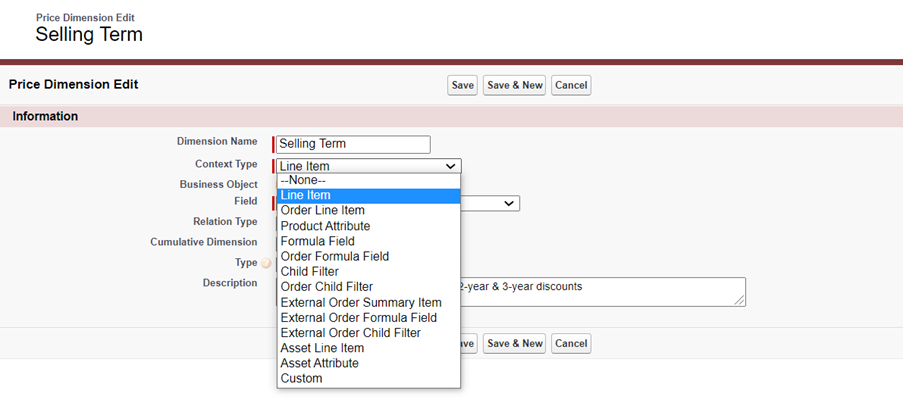
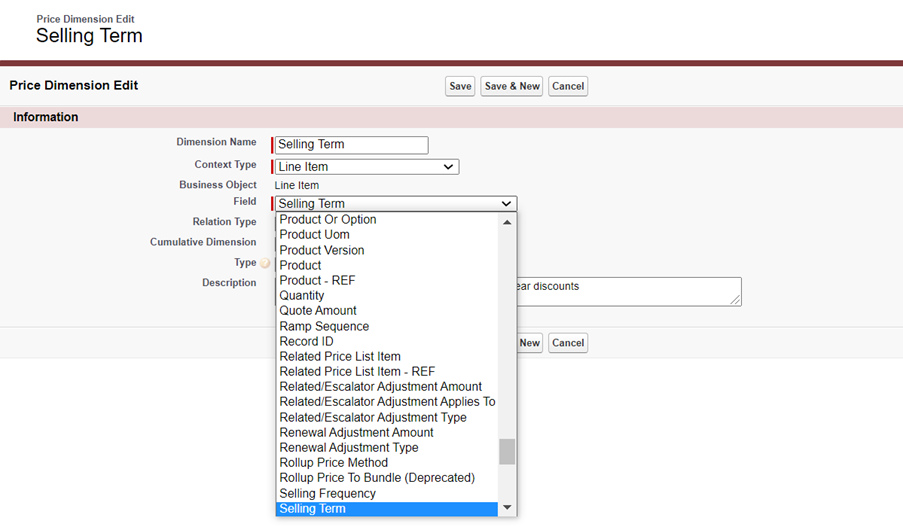
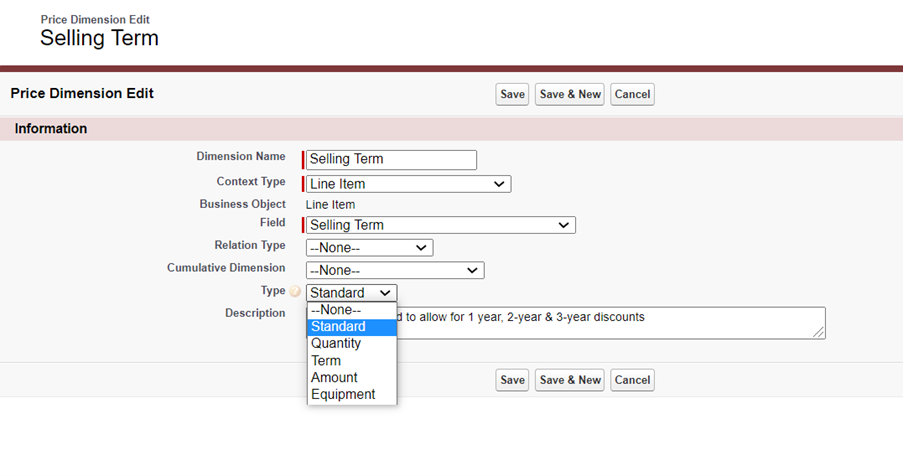
Price Dimensions are required to link any field within Salesforce into the pricing tables. Any field such as Quantity, Term, and more or Attribute will determine a pricing adjustment and needs a dimension created for it.
Steps:
- From App Launcher, Click on Apttus Pricing Setup App and then click on Price Dimension Tab.
- Click New.
- Enter Details for fields like Name, Context Type, Field, etc.
- Click Save.
 Price Matrix:
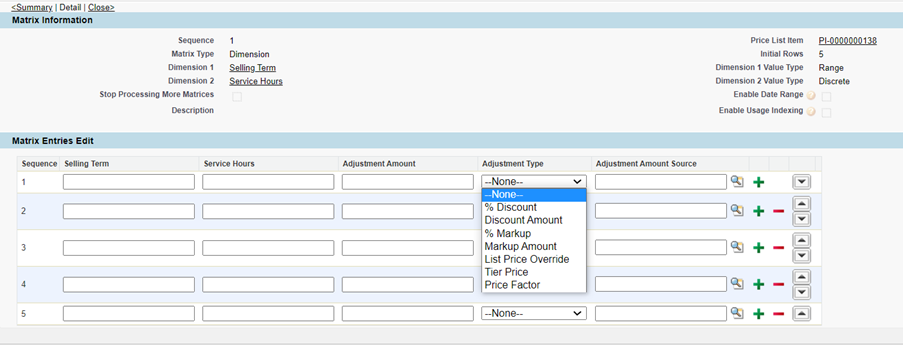
Price Matrices are used for advanced pricing concepts, ie. Tier Pricing, Criteria based pricing.
For Eg. the Pricing of Product A is as follows-
- 1-5 Quantity of Product A is free.
- 6+ Quantity should be charged a certain amount.
So if the User selected Quantity as 10 first 5 will be sold as free, and a further 5 will be charged the amount per Product.
Price Matrix is added in a Price List Item. Multiple Price Matrices can be added to a Single Price List Item. If a product's price is derived from a matrix, the Amount in the List Price field is overridden.
Steps:
 Price Escalator:
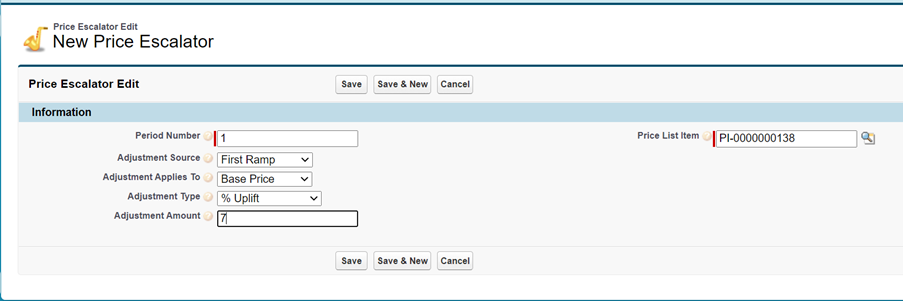
Price Escalators are used to define a markup or uplift on the Ramp Line Items. It doesn't matter if the Product is a Bundle or Option Price Escalator can be applied.
Steps:
- Navigate to your Price List Item record and search for Price Escalator related list.
Click New Price Escalator and enter the following details:
Field Description Period Number Defines the ramp line number Adjustment Source First Ramp, Previous Ramp Adjustment Applies To Values for the different prices to which the adjustment is applied.Valid values are List Price, Base Price, and Extended Price. Adjustment Type This Field accepts values for manual adjustments whether you want to apply discount or markup on the Price. Adjustment Amount Field to enter in the amount or percentage of manual adjustment. Price List Item This is Lookup to the Price List Item. - Click Save.


