
Personalization of Account Coding in Oracle Fusion
Satish Babu
Mar 26, 2021
Is your business looking to reduce the complexity in its dispensation of Invoice Accounting? Are you exhausted of delays in settlements to your Vendors and continuous manual interventions and follow-ups? Jade Global offers businesses a robust solution for Invoice Processing.
Payable Invoices require the Distribution of combination information for accounting entries. This accounting information can be routed to the users for entering the distribution information. Rules can be set to route to specific users based on business requirements.
When the invoice Account Coding in Oracle Fusion starts, a workflow builds the assignees' list based on the defined rules to receive through worklist and email notifications. The user shall input the distribution combination information directly into the worklist and complete the assigned task.
Often businesses want to track down the notification process in real-time at the Invoice level and a combined list as a report. No standard feature or out-of-the-box report is available in Oracle Fusion Cloud; however, we can achieve the same through Personalization and Custom Reports, respectively.
The imminent approach of Personalization can also be used for various other business requirements.
This blog will explain the routing process and BPM rules' setup to enable the Invoice Coding workflow notification.
It will further walk you through Personalization to display the Invoice Coding workflow history within the Invoices screen next to the Invoices Approval tab. The prerequisites needed for this will be discussed in-depth below.
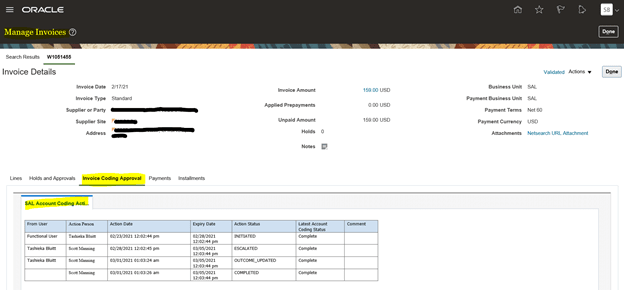
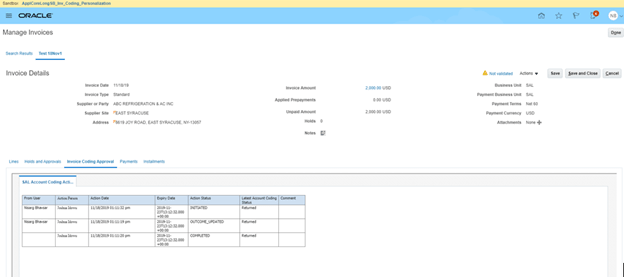
After all the setup and Personalization, the Invoice Coding history will appear in the Invoice as below:
Invoice Account Coding Flow
The steps needed for Invoice Code routing involve the phases below:
- Enabling the Invoice Account Coding Workflow
- Under Manage Invoice Options, enable the Invoice Account Coding check box option.
- Configure to route to the assignees based on the business requirement.
- Input Invoices
- Create the Invoices using a Spreadsheet, manual gateway, Interface, or imaging of Invoices.
- Invoice Validation
- Kick off the Invoice validation process, which will internally initiate the eligible Account Coding workflow. This can be done manually too.
- Action on the workflow notification
- Once the assignee gets the notification, perform the desired action to input the distribution combination, request more information, or reassign to another person based on configuration and business requirements.
Account Coding Actions
A couple of account coding actions are displayed on the Manage Invoice and Edit Invoice pages.
Initiate: This is the start of the Invoice Coding workflow and routes the workflow to the assigned user. The status for the Account Coding on the invoice screen changes from Required to Initiate.
Withdraw: When the user withdraws any open workflow, the Account Coding status on the Invoice changes from Initiated to Withdrawn. This will cancel the Invoice coding workflow further.
Force Complete: This is used to close the workflow notification as completed forcibly. This will change the status to Manually Completed.
Resubmit: You can resubmit invoices for account coding based on the need. It may need to resubmit when the Invoice was rejected (returned) or withdrawn or for any changes made to the Invoice.
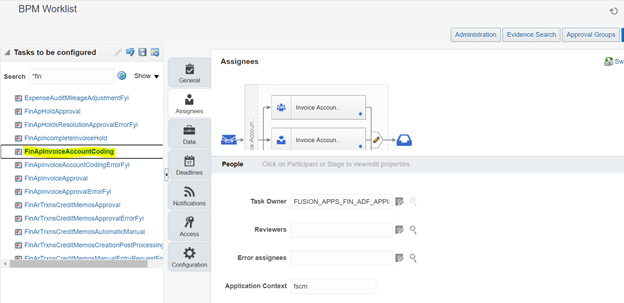
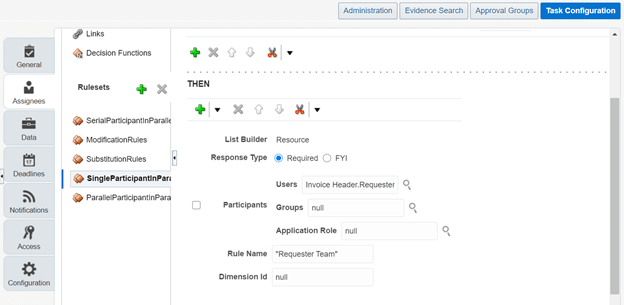
Configuration: The BPM Task name to configure is FinApInvoiceAccountCoding. We can configure to route the workflow to any user based on the requirement. The example below has been configured to route to the Invoice Requester. I will escalate to one level of the supervisor hierarchy if the Requester does not take action within the workflow period (in the below example, it is five days).
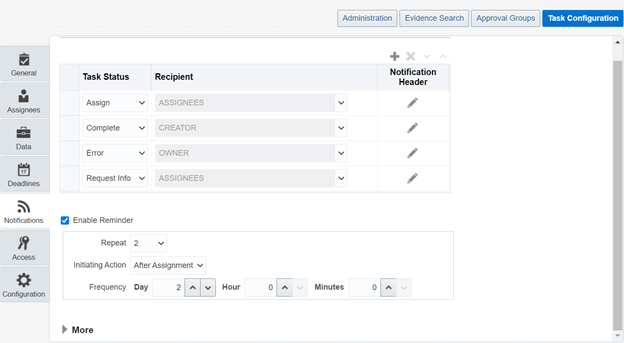
We can also enable a reminder to be sent before the expiry. For example, send a reminder after two days if action needs to be taken.
Enabling Personalization
Prerequisite:
- Create a BIP report to pull the Invoice Coding Workflow action history.
Use who is doing this Personalization need to have Manage Horizontal Extensions Privilege
Login to Instance and Click on Manage Sandbox.

Click on + to create a new Sandbox
Name Inv_Coding_Personalization Description Inv_Coding_Personalization 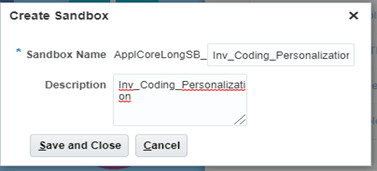
Input Sandbox Name and Save it.
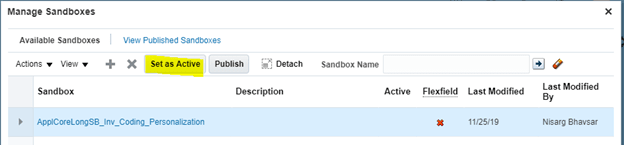
- Select sandbox and activate it using the highlighted button.
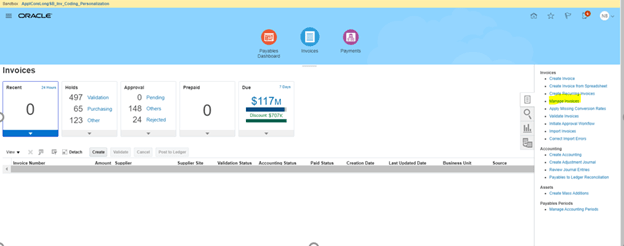
Now go to the Payables -> Invoice page Click on a task and select 'Manage Invoices'
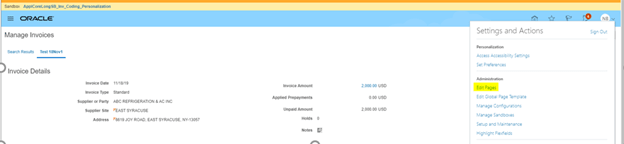
Search for an invoice, open that Invoice, and select Edit Pages from the drop menu

Click on Structure and select 'panelTabbed: above.'
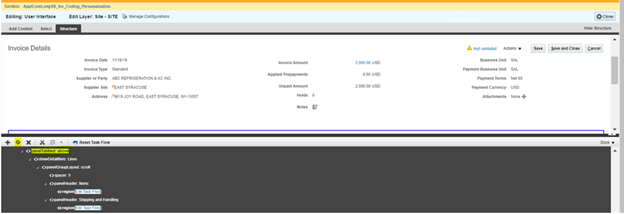
Click on Setting
Text Invoice Coding Approval Inside Tabs, click on Add Tab and provide text as below:

Click on Apply and click on OK. It will create a new tab
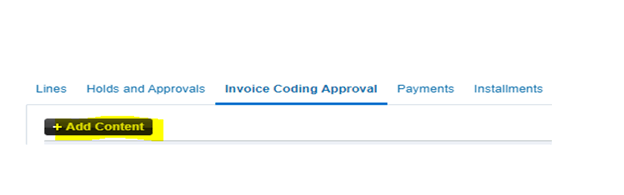
Go to that new tab and click on Add content
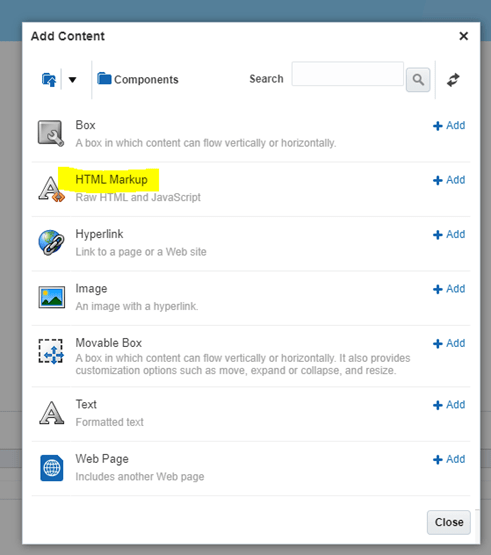
Select Component and then click on Add in front of HTML Markup

- On the newly added HTML Markup, click on Setting
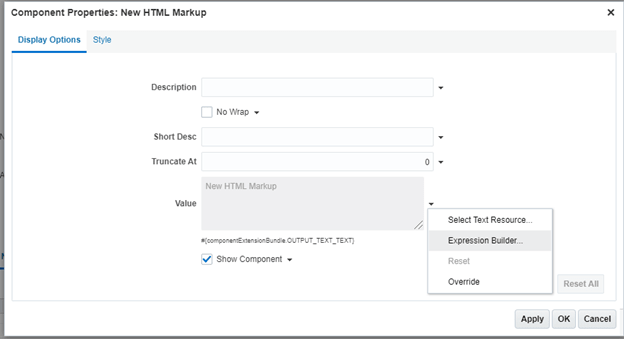
- Click on the Expression Builder for the Value input text area
On the following popup window, provide the expression shown below and click on Test and OK.
Expression <iframe> src="https://<instance_url>:443/xmlpserver/Custom/Reports/Financials/Payables/Invoices/AP%20Invoice%20Account%20Coding%20Workflow.xdo?_xpf=&_xpt=0&_dFlag=false&_edIndex=0&_dIndex=0&_rToken=&_ranDiag=false&_xdo=%2FCustom%2FReports%2FFinancials%2FPayables%2FInvoices%2FAP%20Invoice%20Account%20Coding%20Workflow.xdo&_xmode=4&_xt=AP%20Invoice%20Account%20Coding%20Workflow&_xf=html&_xautorun=true&_paramsP_INVOICE_ID=#{bindings.InvoiceId.inputValue}" width="100%" height="600"> <iframe> 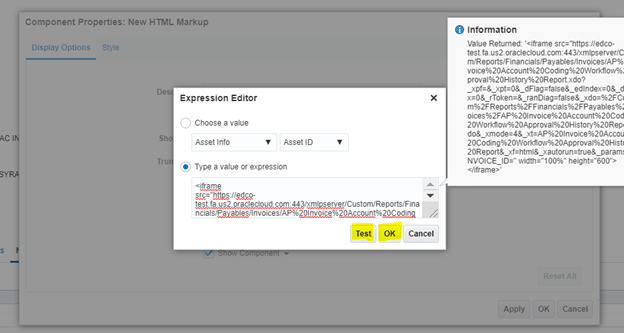
Change <instance_url > with Fusion instance url
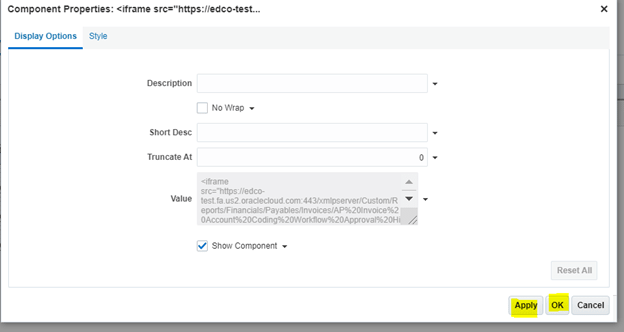
Click on Apply and click on OK
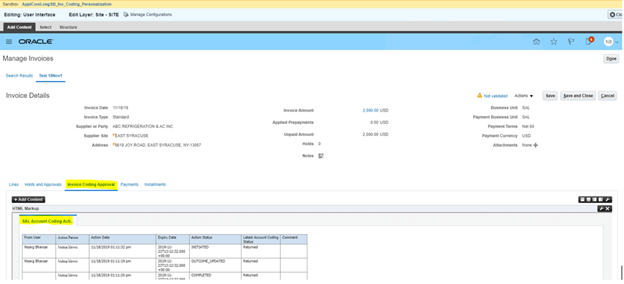
Once done, you can see the report output in the newly added tab

Now click on close
- The page will look like the one shown below:
- Publish the sandbox.
The Personalization enabled here is reusable for different scenarios and varied UI pages.
Subscribe to our Technology Insights


About the Author

How Can We Help You?
Related Posts