
Continuous Integration and Continuous Deployment (CI/CD) with SharePoint Framework (SPFx)
Babu Prasad Thummala
Feb 23, 2022
The process of Continuous Integration and Continuous Deployment may appear complicated to understand. We simplify the whole process in a step-by-step tutorial. This blog factors in all challenges and presents ways of resolving them in the process of Continuous Integration and Continuous Deployment.
A typical software development life cycle are
- Planning
- Design
- Development
- Testing
- Deployment
SPFx Development and Deployment process:
- SPFx is developed using Node Js
- We use different npm packages which can be used in SPFx solution.
- We use gulp to build, bundle and package the Solution.
- We get *. sppkg file which can be used to deploy app catalog.
- Deployed SPFx app we can install one or more site collection.
| Development | Build | Deployment |
Install node Js Install Yeoman Generator Install SPFx Yeoman Generator Install Gulp | Build Gulp build –ship Bundle Gulp bundle –ship Package solution Gulp package -solution --ship | Enable the App collection catalog onsite collection (optional & onetime) Connect to App Catalog Upload/ Deploy the *. sppkg file in app catalog. Install the SPFx App in app catalog. |
How do we implement CI/CD?
- Automate SPFx package build part using CI (build pipeline)
- Automate deployment of package (CD) to deploy to app catalog and install app to target site collections.
This blog explains the steps involved in setting up your azure DevOps environment with CI and CD to automate SharePoint Framework builds, unit tests, and deployment.
We have two options available to implement continuous integration, and deployment in Azure DevOps.
- Azure Build Pipelines and Release Pipelines
- Azure Multi-stage Pipelines.
This blog explains about Azure build and Release.
Implementing Continuous Integration (Build Pipeline)
Continuous Integration (CI) helps developers to integrate code into shared repository and verifying the build using unit tests and packaging the solution whenever new code changes are submitted through pull request.
To setup Azure DevOps for Continuous Integration with a SharePoint Framework solution requires the fallowing steps.
- Creating the Build Definition
- Installing Node Js
- Restoring Dependencies
- Executing Unit Tests
- Importing Test Results
- Importing Code Coverage Information
- Bundling Solution
- Packaging the Solution
- Preparing artifacts
- Publishing the artifacts
- Creating the Build Definition
The build definition includes all the definitions and their configurations for the build. Start Continuous Integration by creating a new build definition and link it to repository.
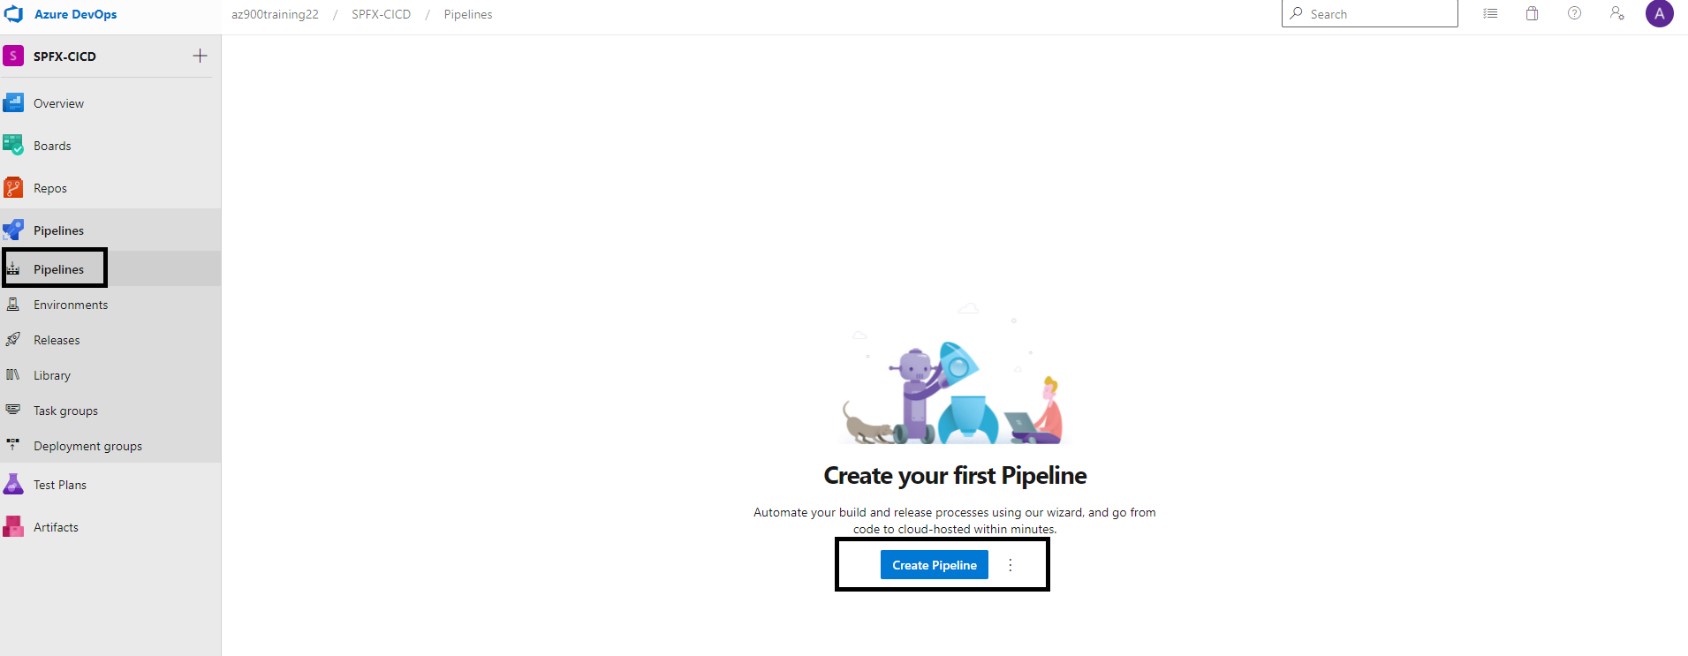
Go to azure DevOps pipelines and click on create Pipeline.
Select the Repository to build the pipeline and here we will have 2 options to create new pipeline with YAML code and another one with using classic editor (PS: Here I am using classic editor to create the build pipeline).
Mainly here we have 4 steps which are Connect, Select, Configure and Review
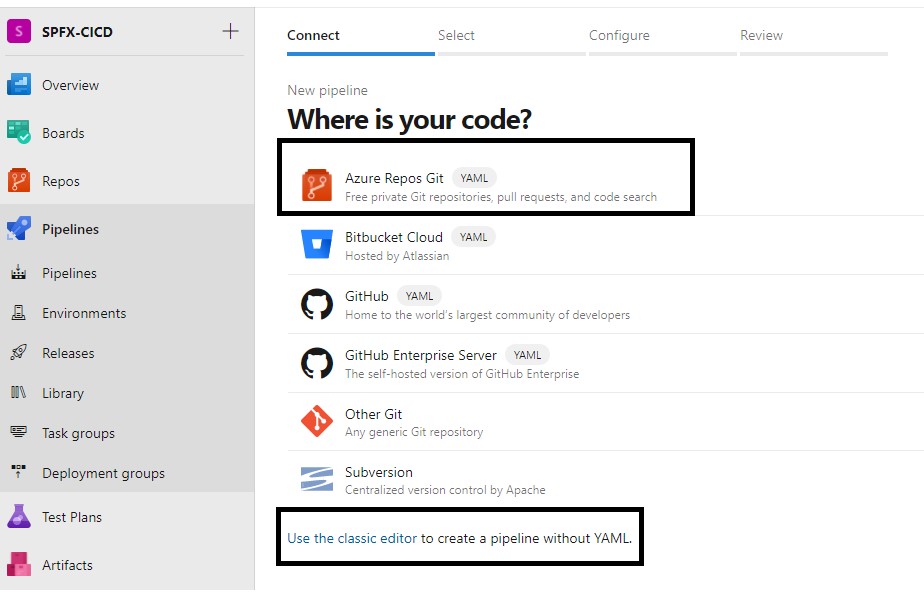
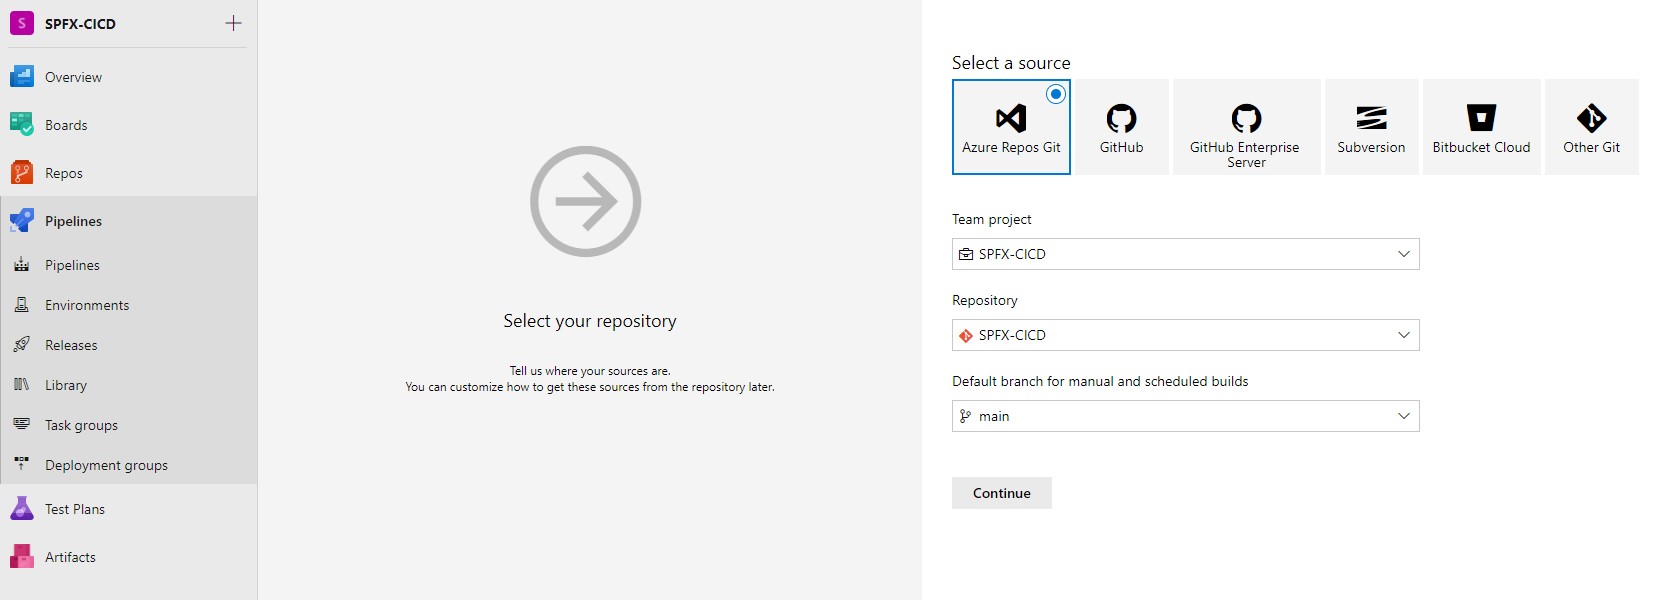
Then click on the classic editor and select the source repository.
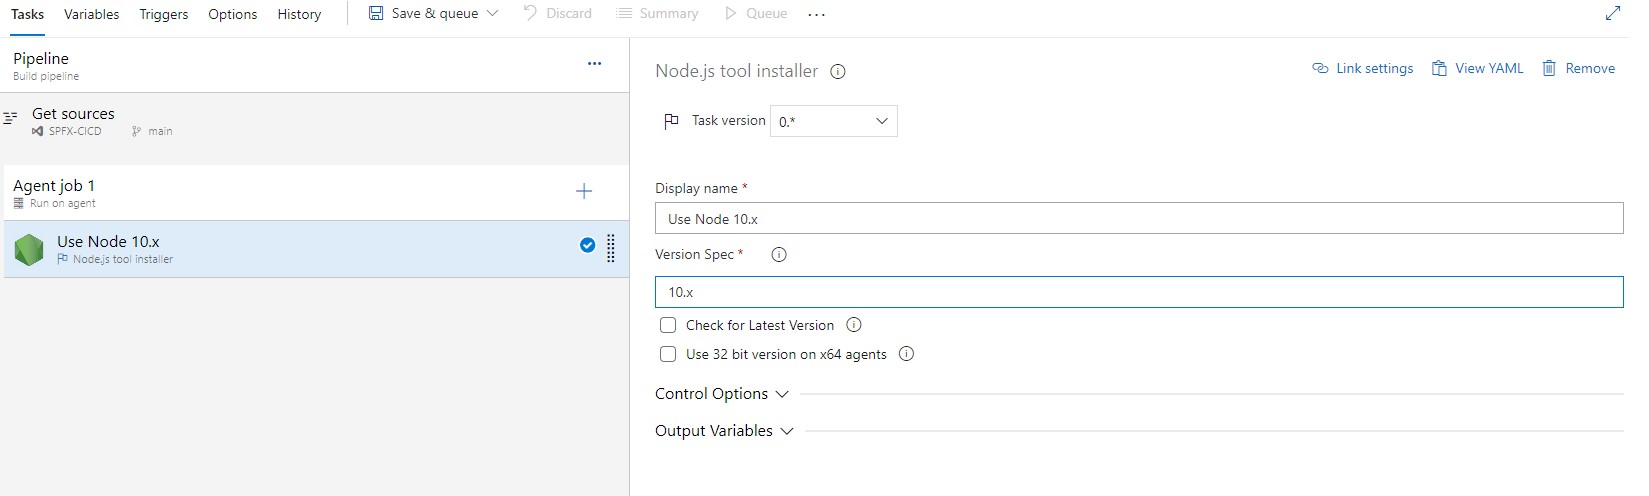
- Installing Node Js
Once build definition has been created, the first thing we need to do install NodeJS. Make sure to install version 10 (current using version), as SharePoint Framework depends on it.
- Restore Dependencies
Because third party dependencies are not stored in the source control, we need to restore those before starting to build the project. now add a npm task and set the command to install.

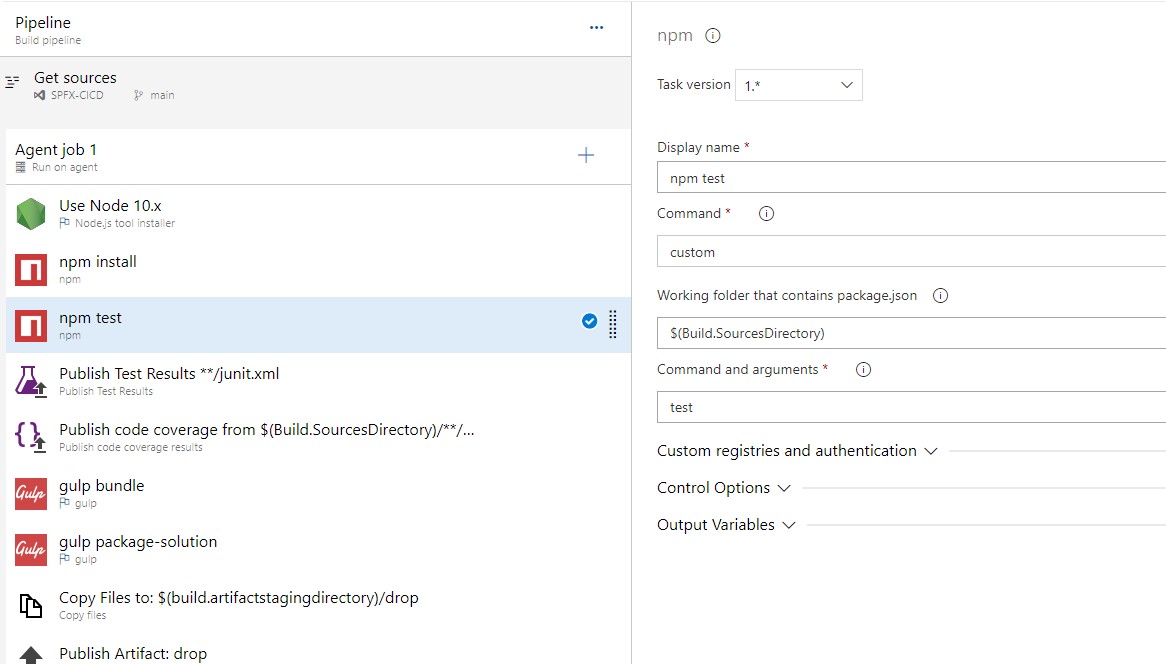
- Executing Unit Tests
SharePoint Framework does not provide testing framework by default. These modules will be installed in a later step and highly recommended at a minimum to test the business logic of our code to get feedback on any high-risk issues as soon as possible. To execute unit tests, add a npm task.
Update the command to custom and custom command field, enter test. Then update the working directory option to $(Build.SourceDirectory)
PS: Executing Unit test are completely optional. With our test cases also, we can create a build pipeline.
To Configure Unit tests, we need to do fallowing setup in project.
Configuring Jet:
Navigate to project folder path and execute the below command. This command will be created jest.config.json file inside config folder in solution.
npm i jest jest-junit @voitanos/jest-preset-spfx-react16 -D
| D:\POC\VSTS\SPFX-CICD>npm I jest jest-junit @voitanos/jest-preset-spfx-react16 -D |
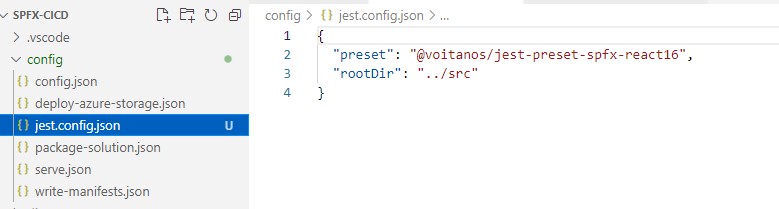
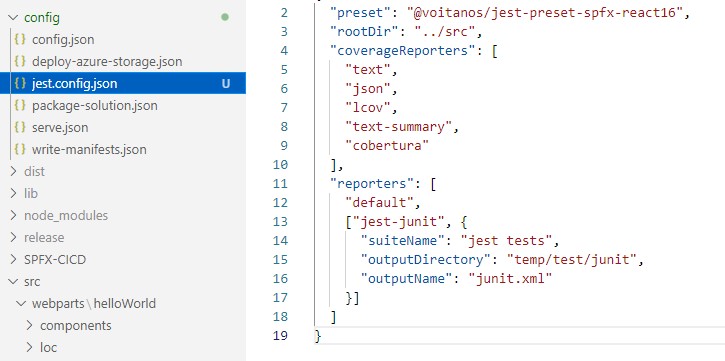
Now we also need to configure jest to do so open jest.config.json file and add the below code.
{
"preset": "@voitanos/jest-preset-spfx-react16",
"rootDir": "../src",
"coverageReporters": [
"text",
"json",
"lcov",
"text-summary",
"cobertura"
],
"reporters": [
"default",
["jest-junit", {
"suiteName": "jest tests",
"outputDirectory": "temp/test/junit",
"outputName": "junit.xml"
}]
]
}
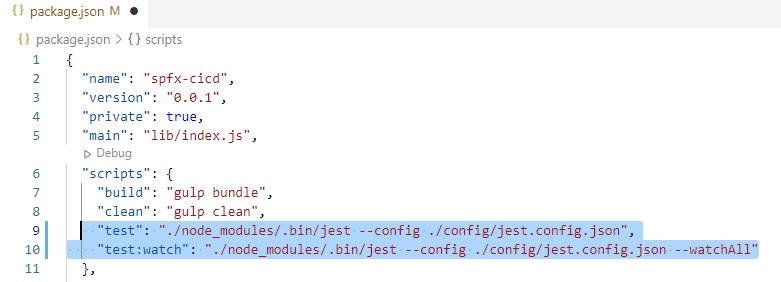
Next need to configure project level to leverage jest when typing commands. now edit the package.json file and add/replace the below scripts.
"test": "./node_modules/.bin/jest --config ./config/jest.config.json",
"test:watch": "./node_modules/.bin/jest --config ./config/jest.config.json --watchAll"
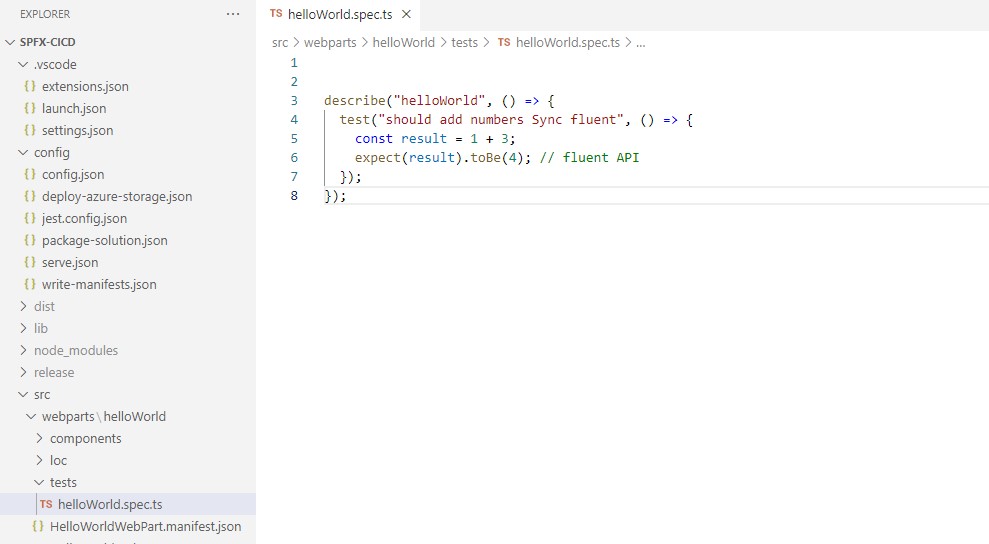
Writing a Unit test:
Now we need to create a new file ex: src/webparts/webPartName/tests/webPartName.spec.ts and add the below code this will helps to write a unit test
describe("webpart_Name", () => {
test("should add numbers ", () => {
const result = 2 + 2;
expect(result).toBe(4); // fluent API
});
});
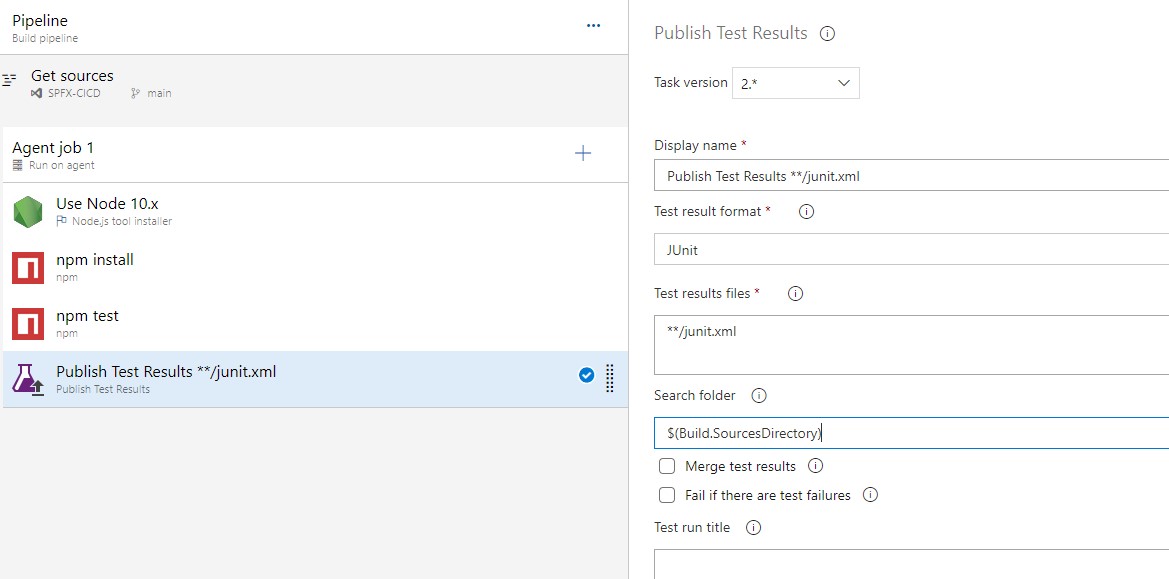
- Importing Test Results
In order to get test results information attached with the build results we need to import these test results from test runner into Azure DevOps. Now Add a new task as Publish Test Results. update the Test results files field to **/junit.xml and the search folder to $(Build.SourceDirectory).
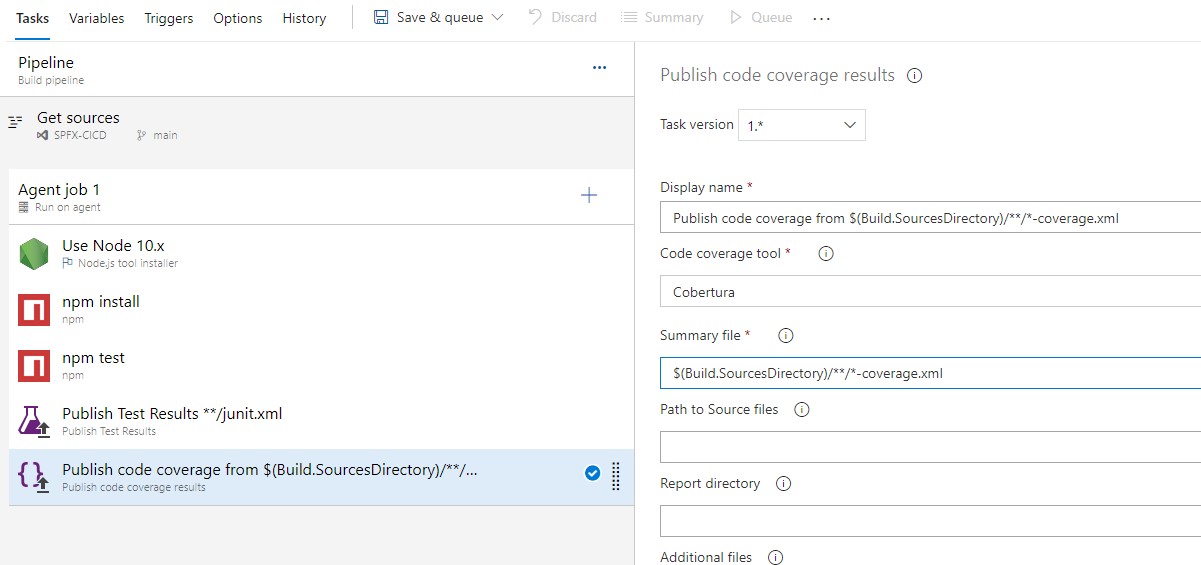
- Import Code Coverage Information
To get code coverage reported with build status need to add a task to import that information. To configure the code coverage information, add the publish code coverage results task. And set the Code coverage tool to Cobertura and Summary files to $(Build.SourceDirectory)/**/*-coverage.xml.
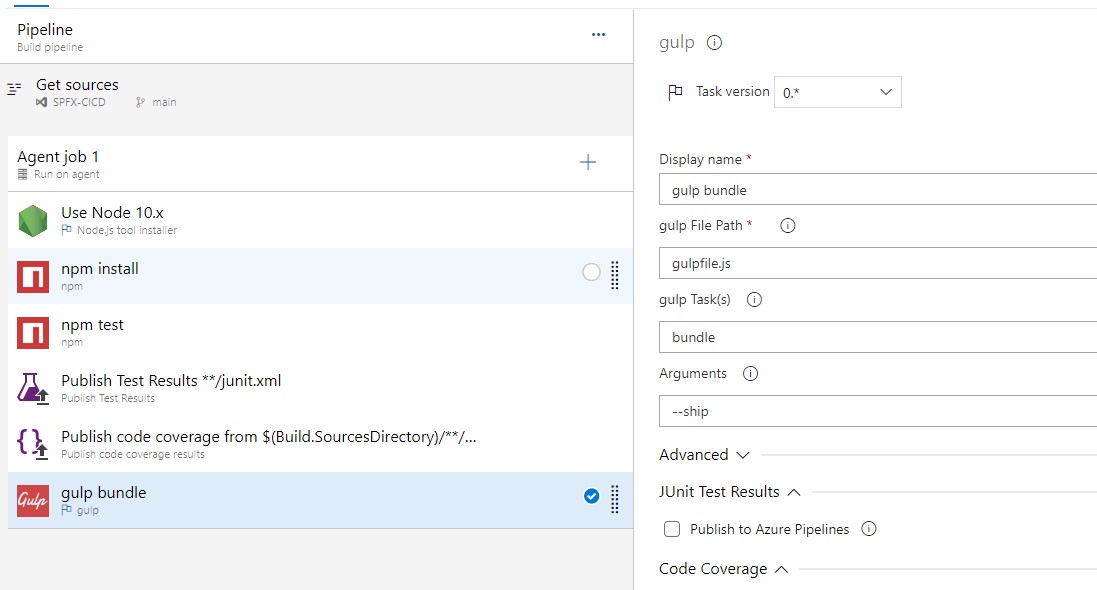
- Bundling the Solution
We first need to bundle our solution in order to get static assets that can be understood by a web browser. add another gulp task, set the gulp file path ,set the Gulp Tasks field to bundle and add -- ship in the arguments.
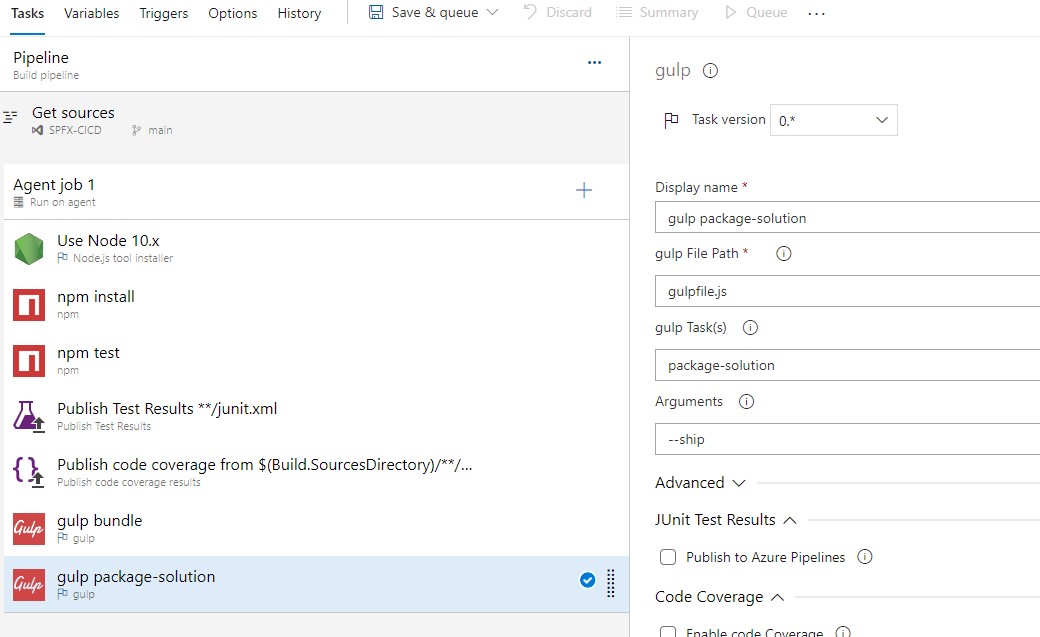
- Packaging the Solution
Now we have a static assets, next step is to combine the assets into a package SharePoint will deploy.
Add another gulp task, set the gulpfile path ,set the gulp tasks field to package-solution and add --ship in the arguments.
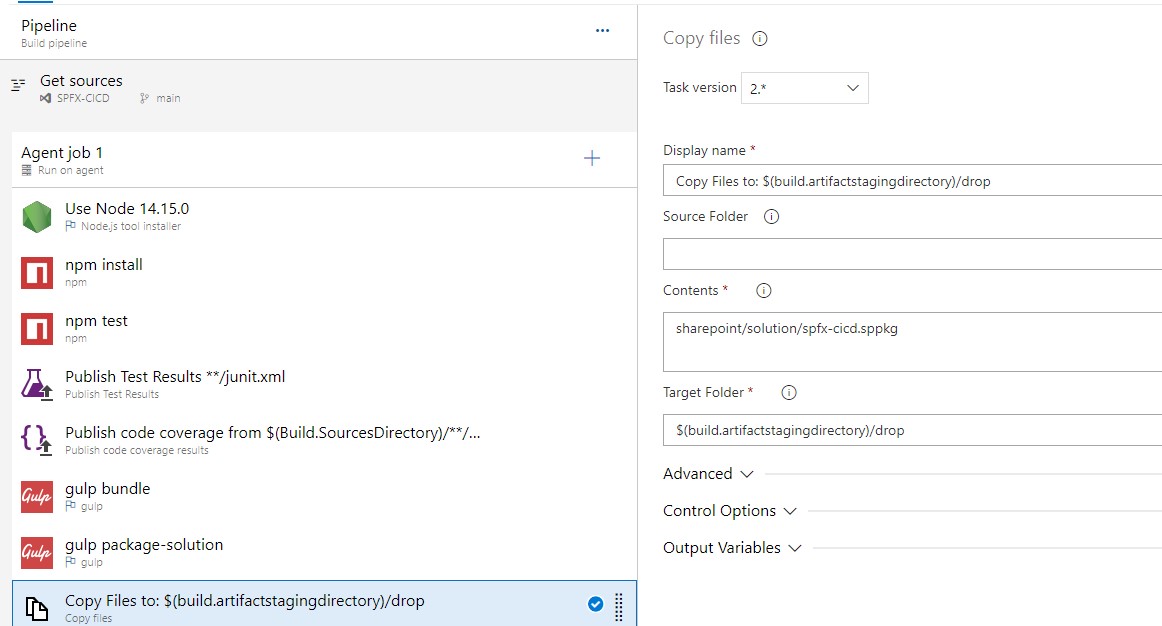
- Preparing the Artifacts
Azure DevOps build doesn’t retain any files, we need to explicitly indicate which files should be kept.
Add a Copy Files task and set the Contents to **\*.sppkg[ex: sharepoint/solution/spfx-cicd.sppkg](the SharePoint package is created with the previous task) and the target folder to $(build.artifactsstagingdirectory)/drop.
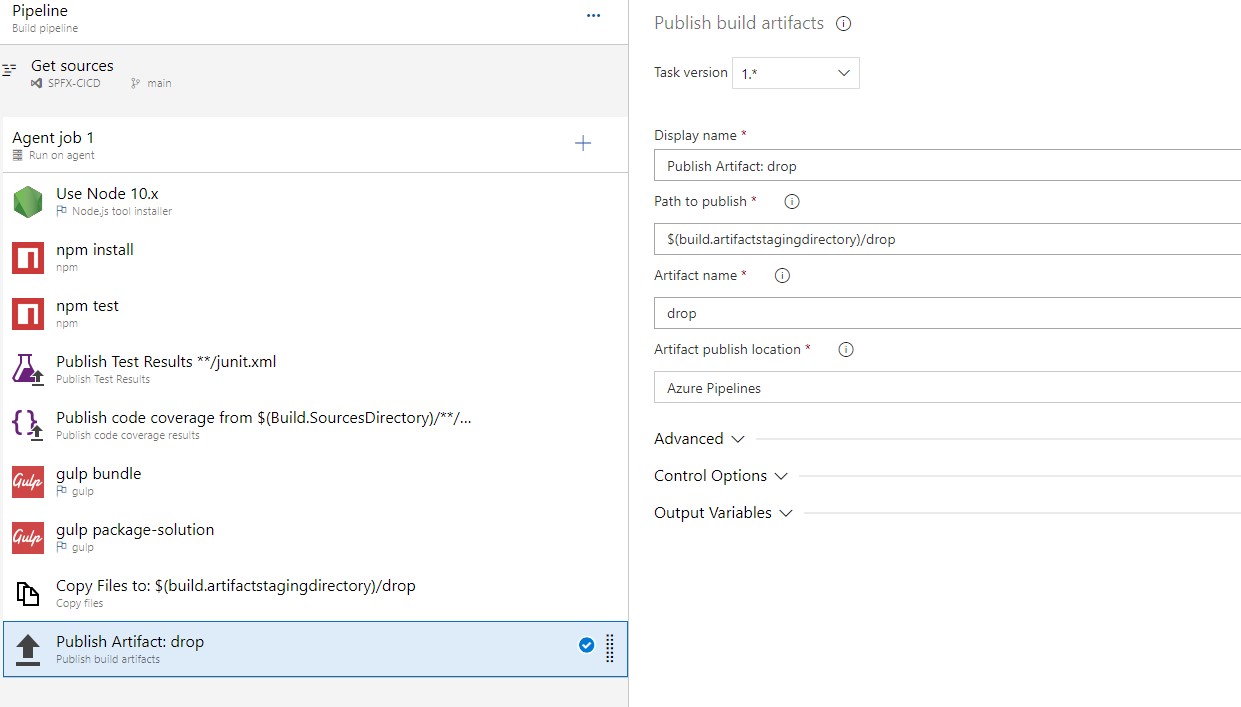
- Publishing the Artifacts
We have collected all the files needed for deployment in a special artifacts folder, now we need to instruct Azure DevOps to keep these files after the execution of the build.
Now add a Publish artifacts task and set the path to publish to $(build.artifactsstagingdirectory)/drop and the Artifact name to drop.
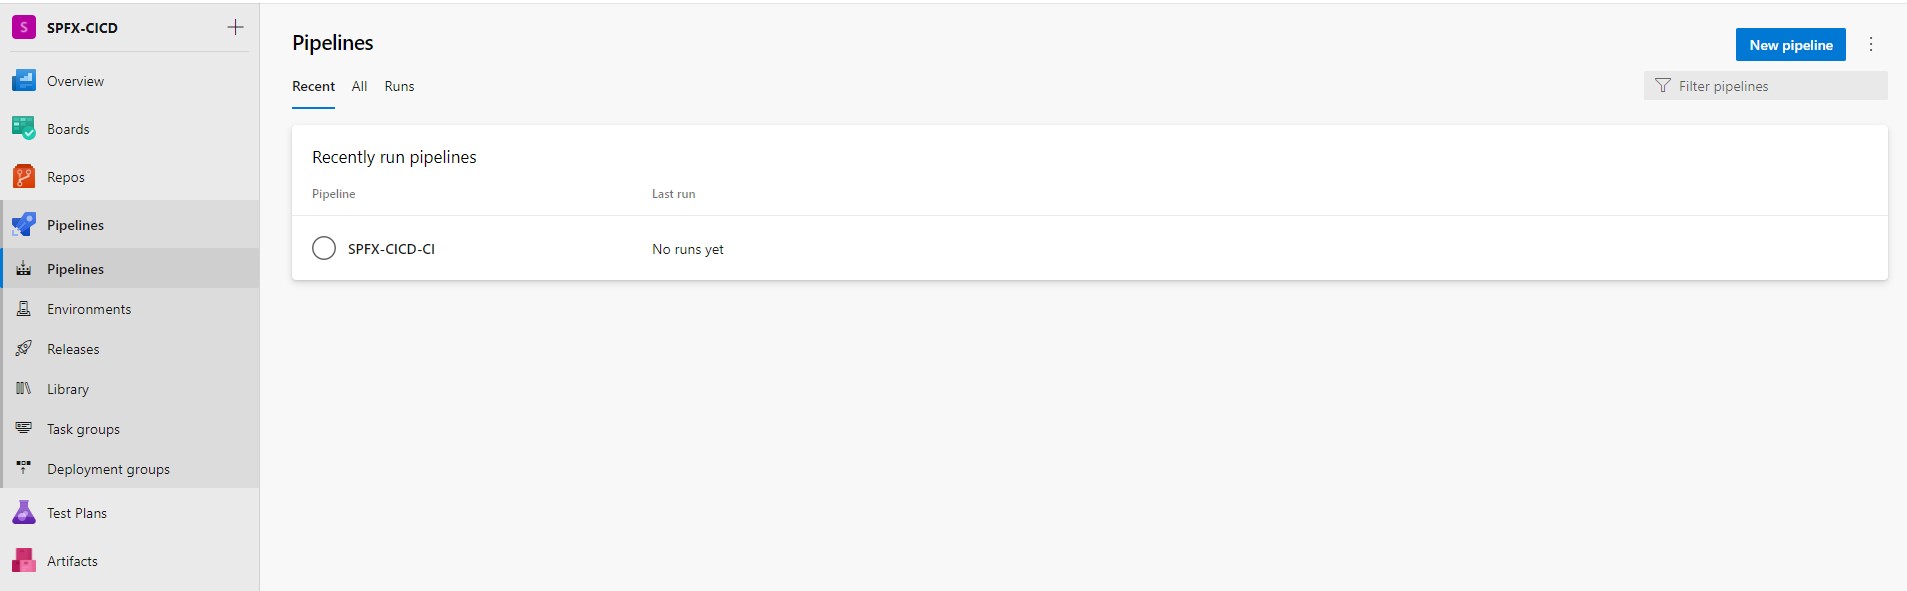
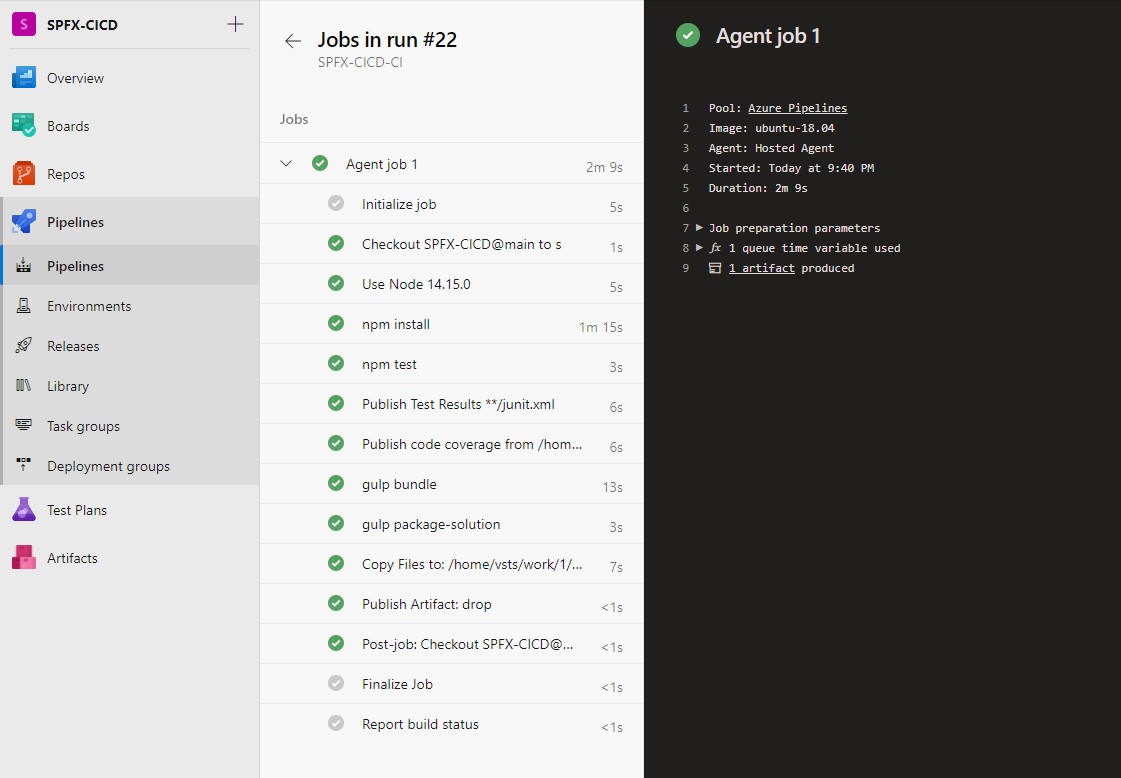
Once we done all these steps save and go to pipelines from left side navigation menu. We can see the newly created pipeline.
Now select the pipeline and run the pipeline. Where we can see different options to choose as below. Here I am running the pipeline with ubuntu agent.
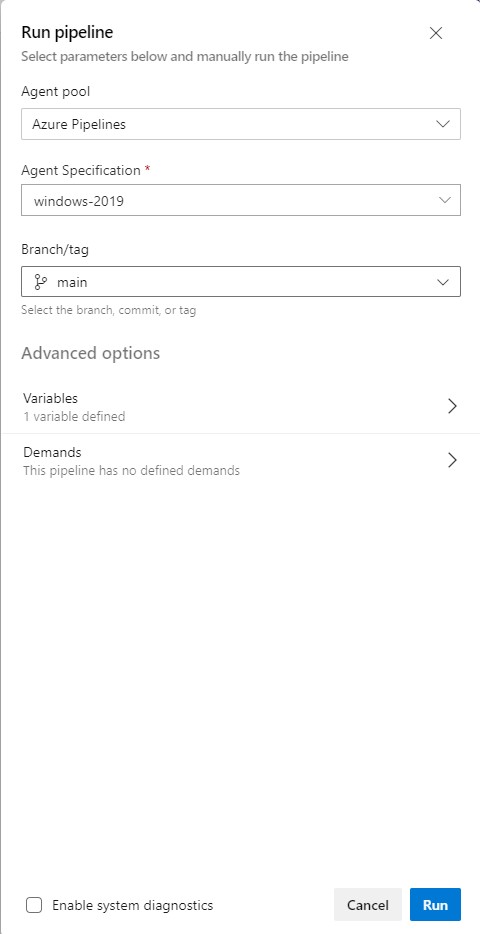
Once we hit on Run button and once build Is complete we can see below screen. With this Continuous Integration setup has been completed.
Continuous Deployment (Release Pipeline)
Continuous Deployment (CD) takes validated code packages from build process and deploys them into a staging or production environment. We can track which deployments were successful or not.
Settings up Azure DevOps for Continuous Deployments with a SharePoint Framework solution requires below steps:
- Creating the Release Definition
- Linking the Build Artifact
- Creating the Environment
- Installing Node Js
- Installing the CLI for Microsoft 365
- Connecting to the App Catalog
- Deploying the Application
- Setting the Variables for the Environment
- Creating the Release Definition
Start creating a new release definition with an empty template.
Release Definition is a process that we used to identify the following elements for the deployment.
- Environment
- Deployment Tasks
- Build Artifacts
Go to Azure DevOps and open releases under the Pipelines. Then Create a new release pipeline.

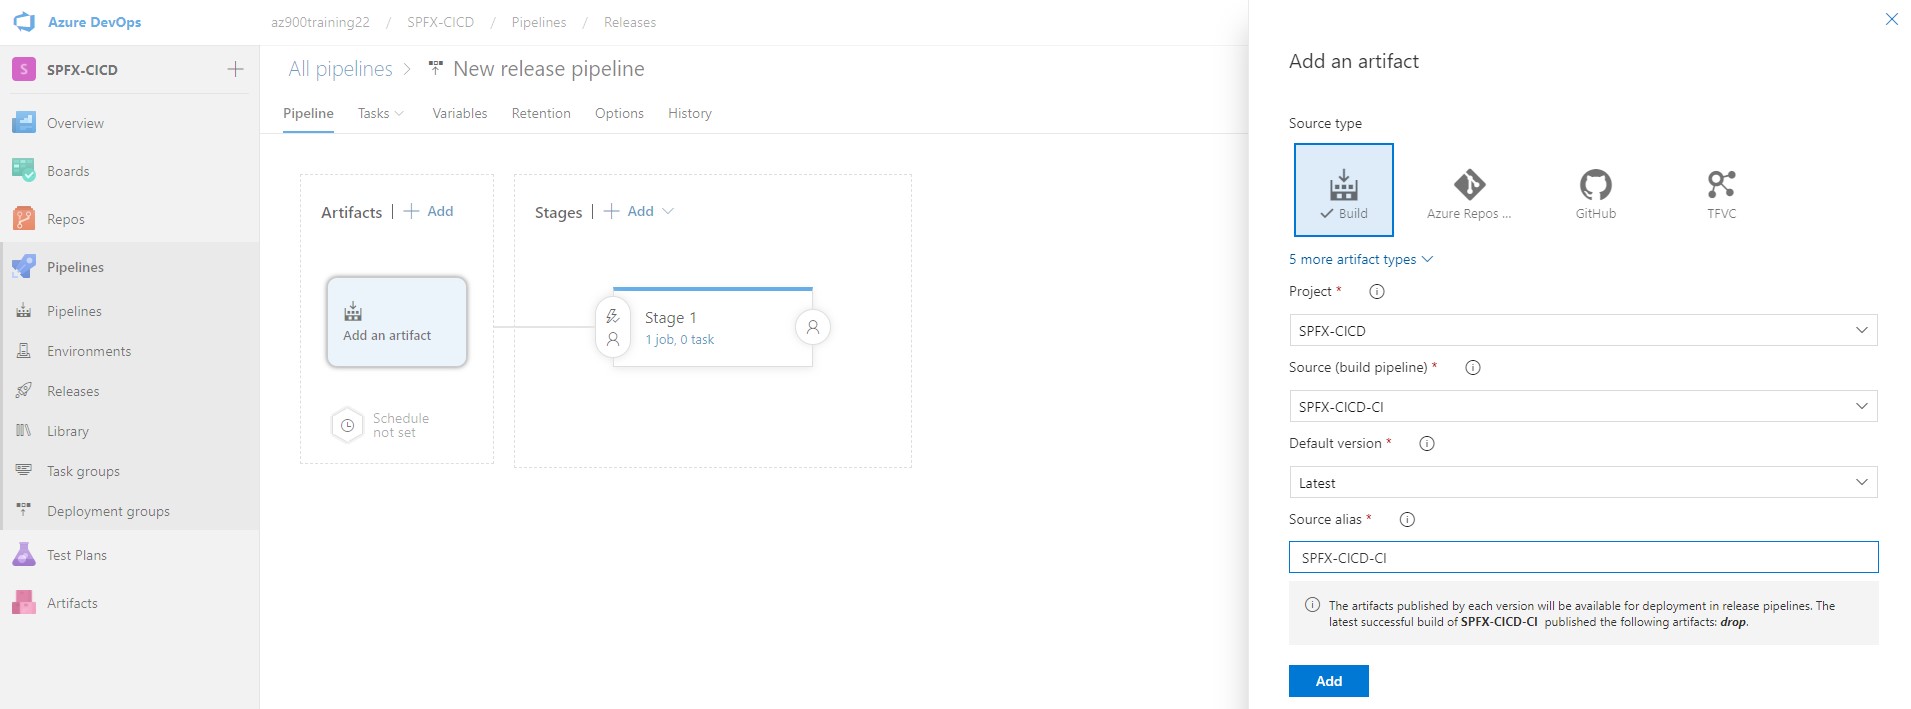
- Linking the Build Artifact
Click on add an artifact text and then select the build definition which we previously created.
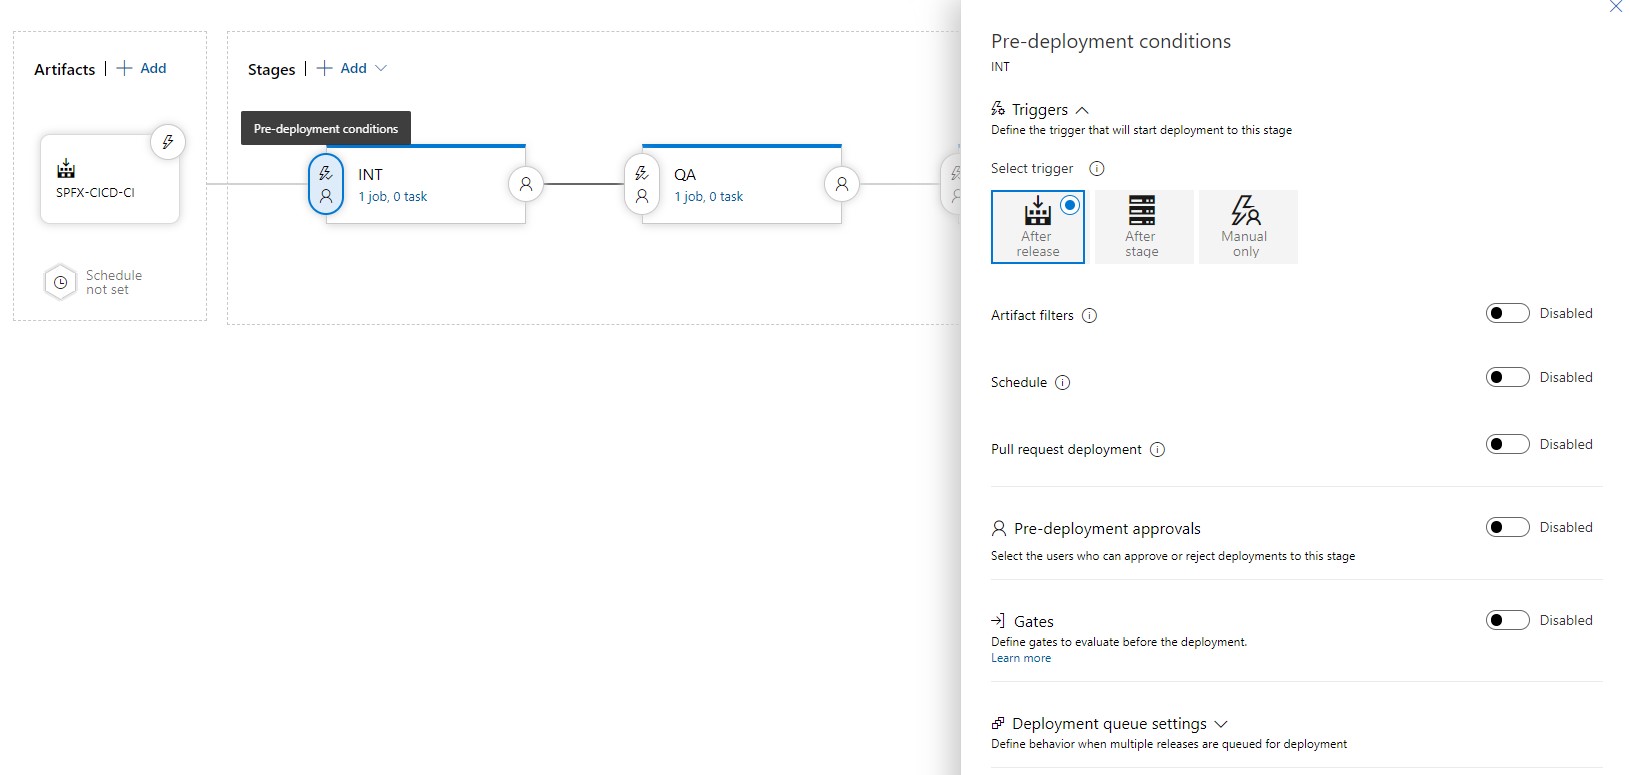
- Creating the Environment
When we create Continuous Deployment environment, we have to give name and configure pre-deployment approvals, artifact filters by clicking on the buttons around the environment box or directly on the title. Here we have single file and single destination. In this release we are going to put the app package file to app catalog. In other scenarios we can have multiple inputs and multiple servers/targets.

- Installing Node Js
First step we are deploying Int Environment, click on 1 job 0 task so that we can access the tasks configuration view. which is same as build definition. Add the Node tool installer task and define 10.X (relevant version) in the version spec field.

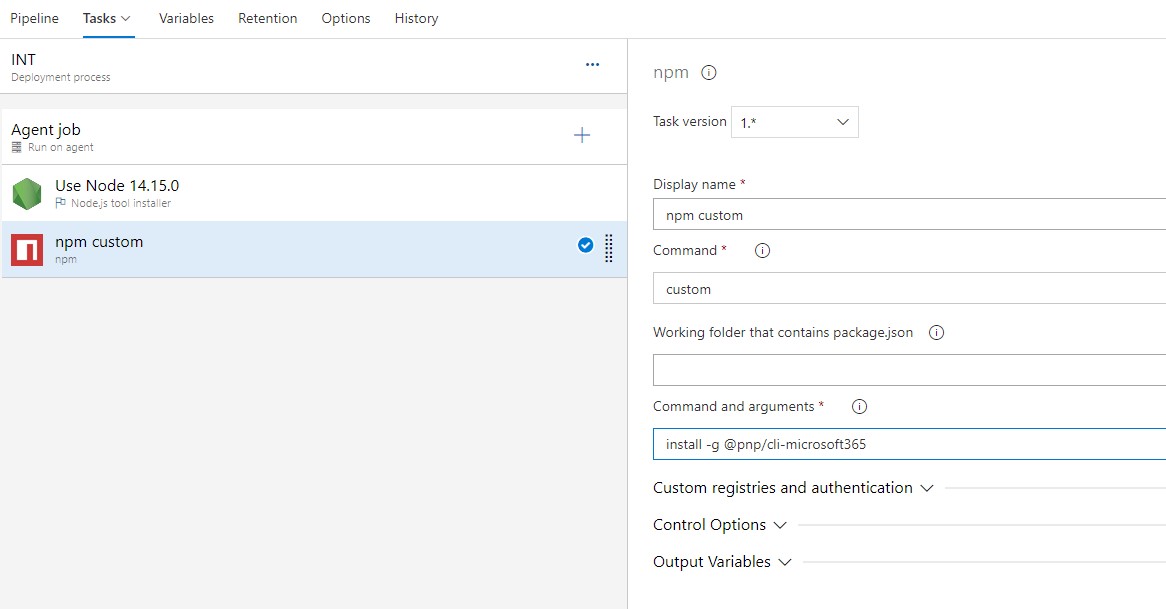
- Installing the CLI for Microsoft 365
Add a npm task, select a custom command and type install -g @pnp/cli-mcrosoft365 in the command and argument field.
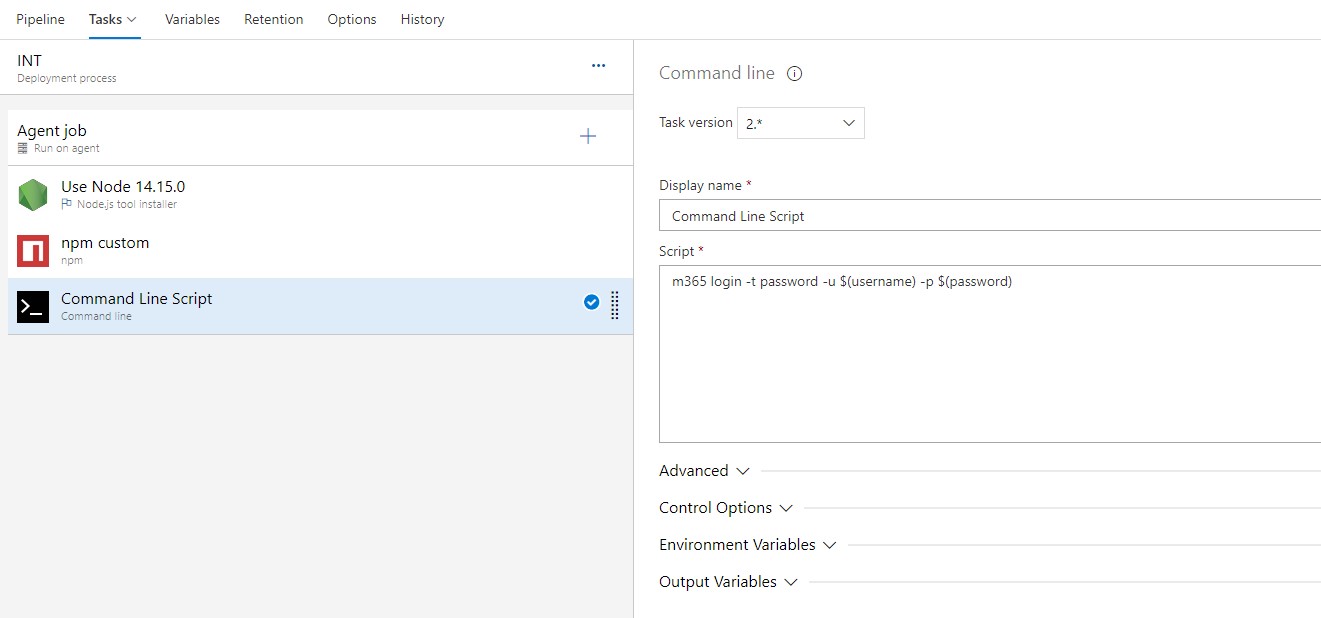
- Connecting to SharePoint Online
To use App Catalog in our deployment environment, we first need to authenticate against App Catalog of your tenant.
Add a Command Line task and paste in the fallowing command into the script field
m365 login -t password -u $(username) -p $(password)
(PS: we need to consent pnp PowerShell before doing the if we have not done earlier to do this execute m365 login in CLI. It gives devicelogin url and code once we enter we have to give consent)
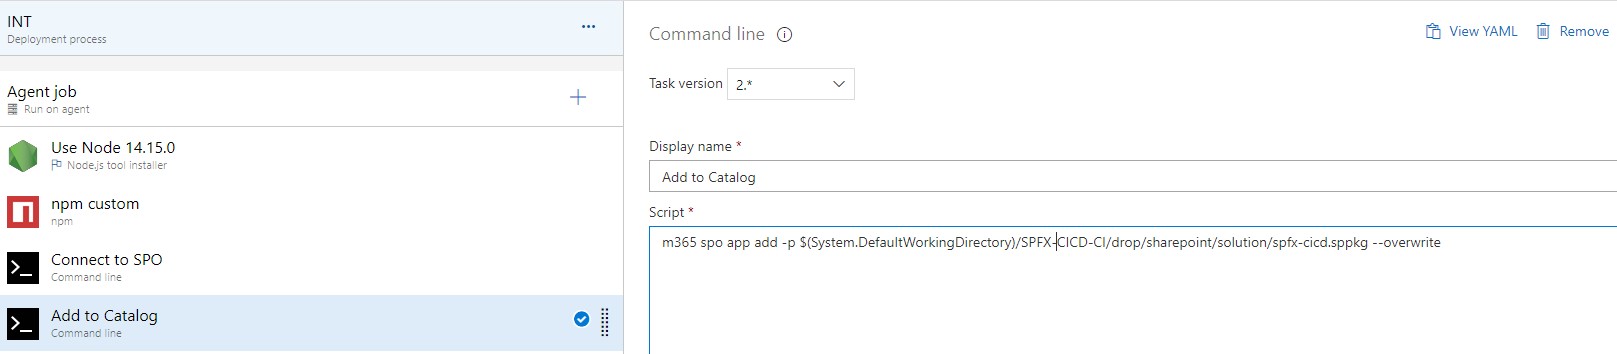
- Adding the Solution Package to the App Catalog
Upload the SPFx solution package to existing App Catalog by adding another Command line task. Add the below command line in the Script field.
m365 spo app add -p $(System.DefaultWorkingDirectory)/SpFxDevOps/drop/SharePoint/solution/sp-fx-devops.sppkg –overwrite ( It will change based on your directory)
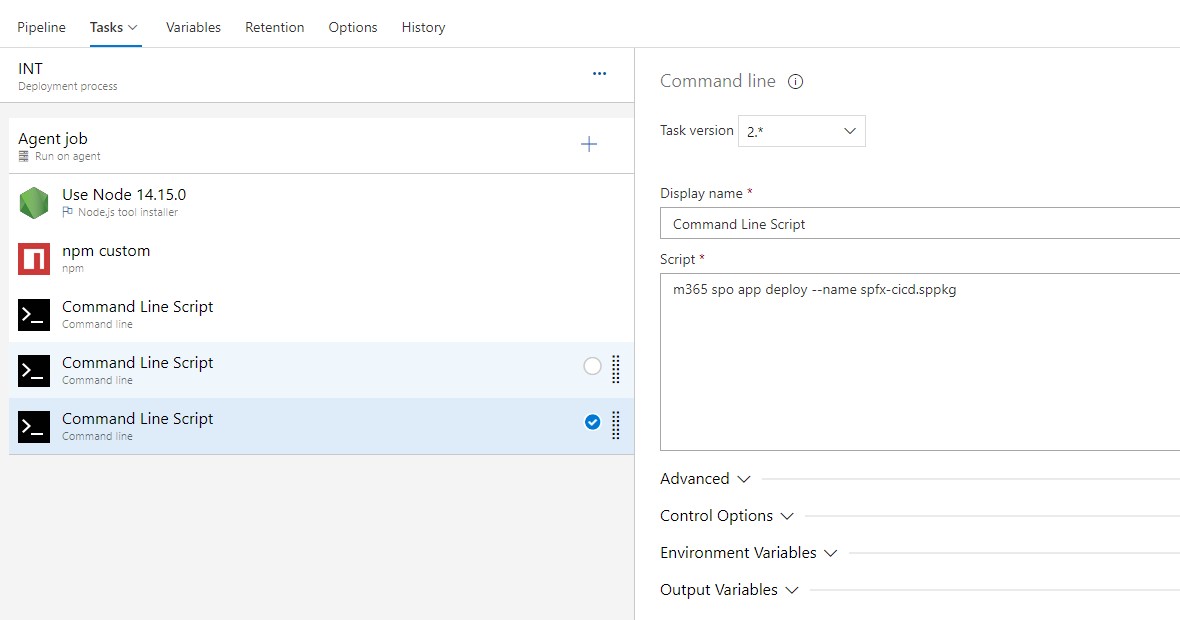
- Deploy the Application
The final step in the setup is to deploy the application to the App Catalog to make it available to all site collections within the tenant as its latest version.
Add another command line task and paste the fallowing command line in the script field
m365 spo app deploy --name sp-fx-devops.sppkg
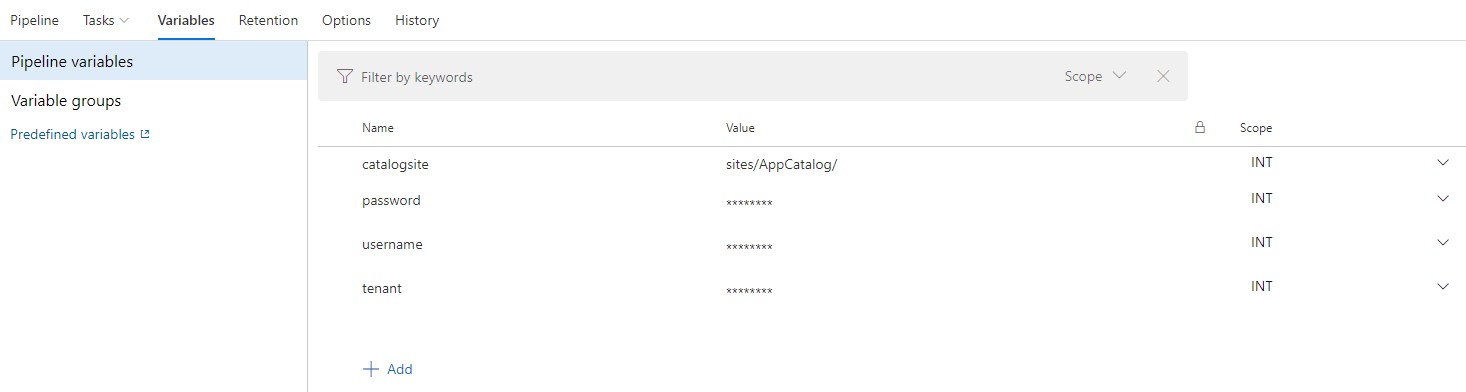
- Setting the Variables for the Environment
The tasks we configured in the last step rely on Azure DevOps process variable. We need to define those variables before being able to run the build definition.
Click on the Variables tab.
We need to add/update the below variables and configure the values.
- catalogsite
- password
- username
- tenant
After adding variables save and go to releases and click on create new release and select the Environments to deploy.

After creating the release pipeline next step is to deploy.

After successful deployment we can see below window.

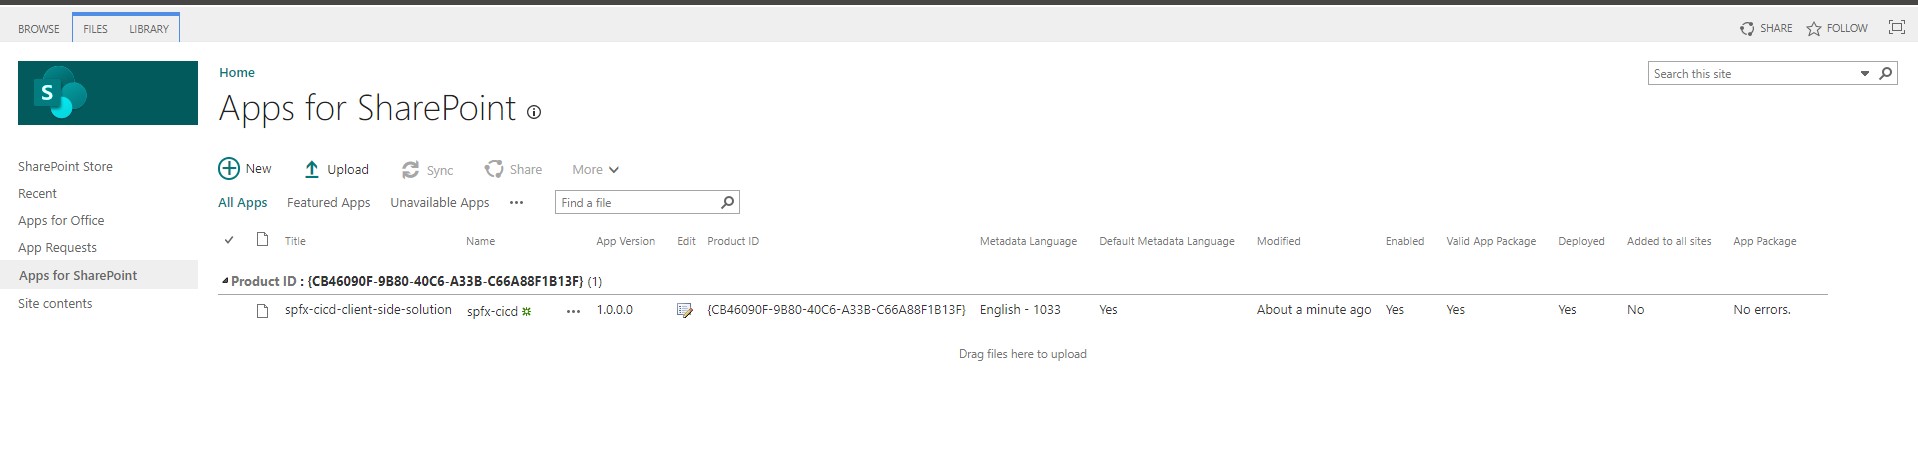
Final Step in testing Login to SharePoint online catalog site and verify whether our package is added or not.
Before Deployment

After deployment.
The Continuous Integration and Continuous Development processes are enhanced by adding Sharepoint’s component, which acts as a force multiplier. Using all these concepts and tools together can deliver faster results and better the automation process.
Subscribe to our Technology Insights


About the Author

How Can We Help You?
Related Posts